User Guide of Leawo DVD Creator
How to create DVD with Leawo DVD Creator?
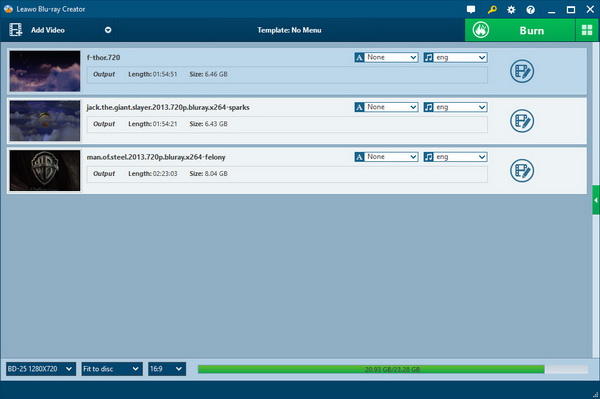
Step 1:Import Video Files
Click "Add Video" icon to load video clips, or directly drag and drop the video clips to the program. Move the videos up and down to swap the priority.

Step 2: DVD Video Customization
Option 1: Edit output DVD video.
Click on the "Edit" icon to edit video, you will get into the following four panels and do corresponding adjustments.
Go to "Trim" to get an exact length of video you want to put into the DVD.

Go to "Crop" to get rid of black margins if there is any.

Go to "Effect" to enhance video and audio detail by adjusting brightness, contrast, saturation and volume.

Go to "Watermark" to apply an image or text as a watermark on the video surface.

Option 2: 3D Settings
Click on the "3D Settings" icon and switch to the section below. Pick up one of the 3D Setting modes from Red/Cyan, Red/Green, Red/Blue, Blue/Yellow, Interleaved and Side by Side, then adjust 3D Depth to achieve the best 3D display effect.

Step 3: Preview Menu Template
This DVD creating program provides you with multiple DVD menu template themes: Standard, Business, Childhood,Education, Holiday, Nature, Sports, Wedding. Select one template according to your preference and have a DVD menu template preview. Video preview is also permitted, what you only need is a simple click on the target video on menu preview window. If the built-in menu templates can't t meet with your specific requirements, turn to "Design Menu" button to customize menu in details.

Step 4: Design Menu
Activate the pen-shaped "Design Menu" button and go to the five panels below to design DVD menu in details.

Background: Music, Image and Video can be chosen to set as DVD background.
Step 5: Further Settings for DVD Creation
Click on the "Burn" in the previous step to turn to the "Burning Setting" panel.

Notes:
Burn To: burn video to ISO File or DVD Folder
Volume Label: insert your own label
Save To: select the destination for you to save the output file
Step 6: Burn Video to DVD
Click "Burn " button to start the burning process. Wait until it is done.


 Products List
with the good work.
From Jay Burt
I was lucky that my search words matched your website offering. I may recommend to
my friends about you.
From Rajesh Madhawarayan
