Last updated on 2025-04-22, by
How to Trim Video in VLC?
VLC Media Player stands out as both free software and a widely-used program. Many people use it to watch videos. You can use VLC to cut videos as well. VLC is not a real video editor. The software lacks editing elements because it does not feature a timeline or video cutting tools found in traditional editing programs. Despite VLC’s limitations as an editor you can edit videos through its record button functionality. To trim your video in VLC you need to play the video first then record the segment you want to save. This article shows you how to edit video clips using VLC. In this article we will cover both potential problems during the process and solutions for fixing them. If VLC fails to function properly, we will demonstrate an alternative straightforward method to trim videos.
OutlineCLOSE
Part 1: Can You Trim Videos in VLC?
VLC allows you to trim videos yet operates through an alternate process. VLC functions primarily as a video player application rather than an editing tool. VLC lacks traditional trimming tools found in dedicated video editors. VLC enables you to capture specific video sections which you wish to retain. To trim a video using VLC you must start the video playback then hit the record button at the beginning of your selected section and press it once again when you reach the end. The selected segment will be saved as a new video file. It works, but it’s not perfect.

Trimming in VLC is simple. The program is available at no cost and runs on the majority of computer systems. It can open almost any video file. You don’t need to install extra tools. The trimmed video remains free from any watermarks. VLC provides basic trimming functionality but lacks precision in its operation. The record button needs to be pressed at the precise moment. VLC lacks both a timeline feature and precise second-by-second trimming functionality. Incorrect timing during trimming may result in the video clip beginning too soon or finishing too late. After trimming video files with this software, the audio may not be aligned with the video content. There are individuals who struggle to locate the storage location of their newly trimmed video. VLC allows users to trim videos but isn’t designed specifically for editing purposes. A specialized video editor is recommended for anyone who wants improved tools and greater control.
Part 2: How to Trim Video in VLC?
Users can easily trim videos in VLC on Windows after learning the necessary steps. Follow these instructions to complete the process from beginning to end.
Step 1: Download and Open VLC
Access the official VideoLAN website to obtain the most recent version of VLC Media Player before downloading. After installing the application on your computer, launch the program.
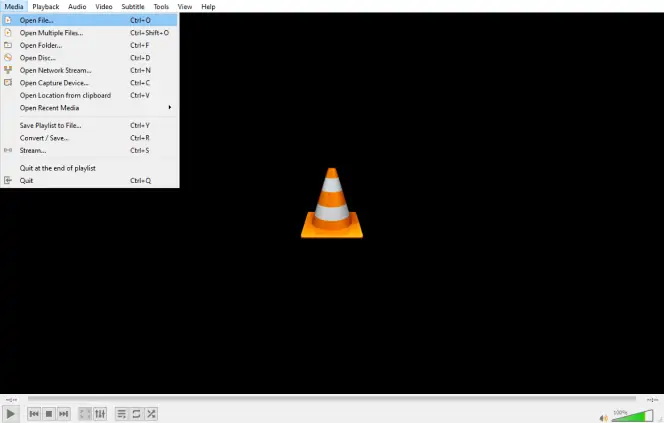
Step 2: Open Your Video File
To start playing your video file in VLC you should drag it from your file explorer directly into the VLC window. To start the video loading process click “Media” on the top left side of VLC and then choose “Open File” to pick your video. Pressing Ctrl + O allows you to open the file through your keyboard.
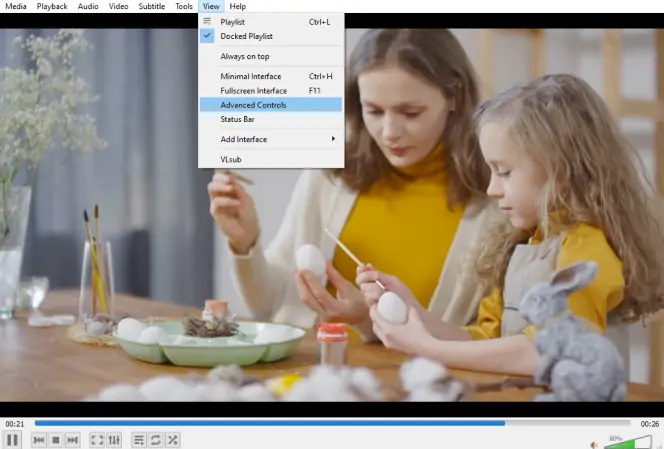
Step 3: Turn On Advanced Controls
To access the editing tools, make sure they become visible. Open the “View” menu located at the top of VLC and choose “Advanced Controls.” A red record button and other buttons will appear above the play button once you progress past this step.
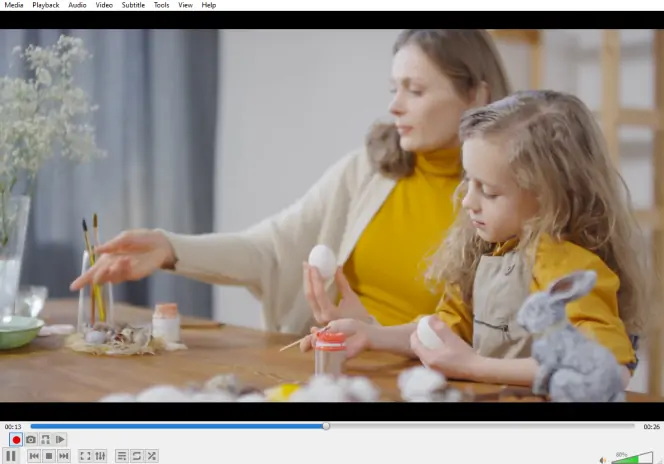
Step 4: Start Trimming
Pause your video at the location where you wish to begin the trimming process. Click the red record button to begin. Restart the video playback and allow it to run until the desired section completes. To stop recording when you reach the end simply click the record button once more. Pressing Shift + R on your keyboard will initiate or terminate the recording process. To achieve greater accuracy during video trimming you can use the frame-by-frame button to advance through your video one frame at a time.
Step 5: Find Your Trimmed Clip
VLC lacks an indication message when your trimmed video is saved which makes this step confusing for users. Your trimmed video file will be stored in the “Videos” directory on Windows systems by default. You can find it in C:\Users\YourUsername\Videos. The file name typically begins with “vlc-record” and includes the date. You can rename it if you want.
Part 3: VLC Not Working? Troubleshooting VLC Trimming Issues
The video trimming process in VLC sometimes fails to work correctly. Recording may not start when you press record or you may not locate the trimmed video file afterward. This guide covers frequent issues encountered when using VLC and provides solutions to resolve them.
1. Video Won’t Record
The first step when the record button fails to work is to verify whether Advanced Controls has been activated from the View menu. Without that, the recording feature won’t appear. If closing VLC and reopening the program doesn’t solve the issue, proceed with this step. Also, check for updates. An outdated version might cause problems.
2. Can’t Find the Saved File
The absence of a pop-up notification when a file is saved makes it simple to overlook in VLC. The default location for VLC to save trimmed videos on Windows systems is your Videos folder. By default, VLC uses vlc-record before the date and time to name saved files. If the file remains elusive, trim a brief test clip to discover its saved location.
3. Audio Is Out of Sync
The audio and video can become unsynchronized after trimming the video. The sound and video misalignment occurs when you end the recording at an incorrect moment. The Frame-by-frame button will enable you to make more accurate cuts which solve this issue. If repeated incidents occur with the same issue consider using another video editing program.
4. Trimming Is Not Accurate
VLC is not built for precise editing. There doesn’t exist a timeline which prevents you from specifying precise start and end times. When you press the record button manually during playback you risk making errors. To achieve better precision when starting your recording you need to pause the video on the desired frame before activating the record button. Improve your video editing control by using keyboard shortcuts such as Shift + R and Frame-by-frame mode. When VLC’s trimming limitations become intolerable you should consider moving to VLC alternatives.
Part 4: Alternative Way to Trim a Video with Leawo Video Converter
Users who find VLC to be inadequate or unstable should consider using Leawo Video Converter as their video editing solution. This application goes beyond video trimming to provide comprehensive video and audio conversion support for 180 formats including MP4, AVI, MKV, MOV, MP3 and FLAC among others. It offers 6X faster speed, 1:1 quality output and includes features to trim videos, edit content, crop footage, apply watermarks and enhance video effects. Users find video trimming in Leawo Video Converter highly accurate and easy to manage because of its real-time preview functionality and timeline control features. This guide shows how to trim a video using Leawo Video Converter.

-
– Convert video/audio between 180+ formats.
– Support iPhone, iPad and all portable devices video and audio convertsion.
– Convert video/audio with 100% quality reserved in 6x higher speed.
– Turn photos (folders) into photo slideshows video.
– Convert 2D to 3D video via editting 3D depth range and 6 different 3D modes.
Step 1: Import Your Video
Launch Leawo Video Converter. You can upload your video to Leawo Video Converter by dragging it into the window or using the “Add Video” button from the main interface.
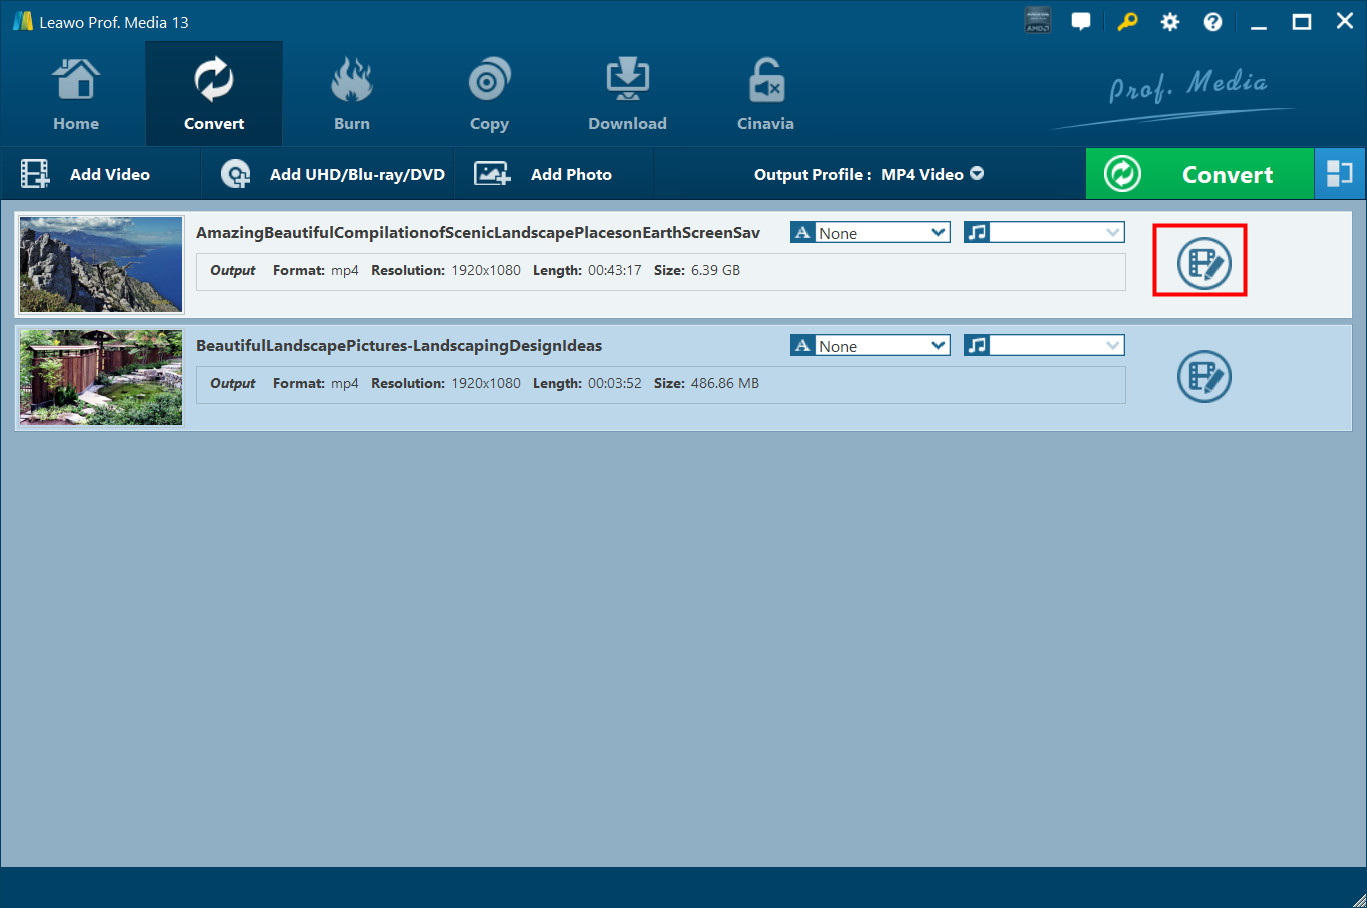
Step 2: Open the Editing Panel
Once the video loads you can locate the small Edit icon (depicted as a pencil) beside the video title. Click it to open the editing window. The editing window shows both a real-time video preview and multiple editing tabs located on the left side.
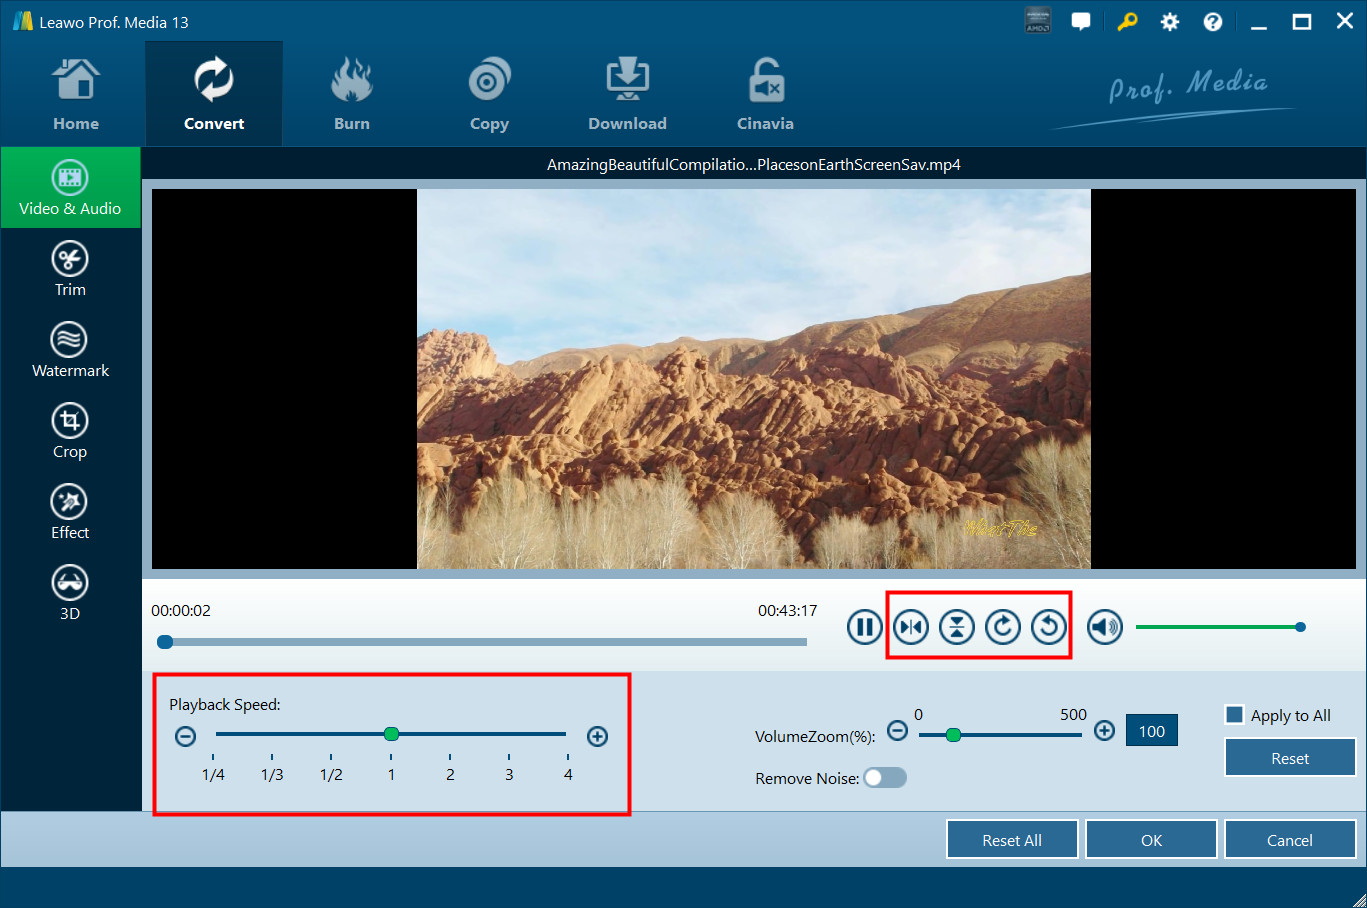
Step 3: Adjust Video and Audio Settings
The Video & Audio tab allows users to modify playback speed between 0.25x and 4x, eliminate background noise, adjust volume levels, and rotate videos in various directions. The video editing options allow you to flip it vertically or horizontally and rotate it by 90 degrees to both clockwise and counter clockwise directions. To save the modifications click on “OK” after you finish.
Step 4: Trim the Video
Click the Trim tab. There are two methods available for trimming the video. Select the start and end points by dragging the slide bars or enter precise times in the “Start Time” and “End Time” fields. The trimmed clip length will be displayed. Click “OK” to confirm the trim.

Optional Steps
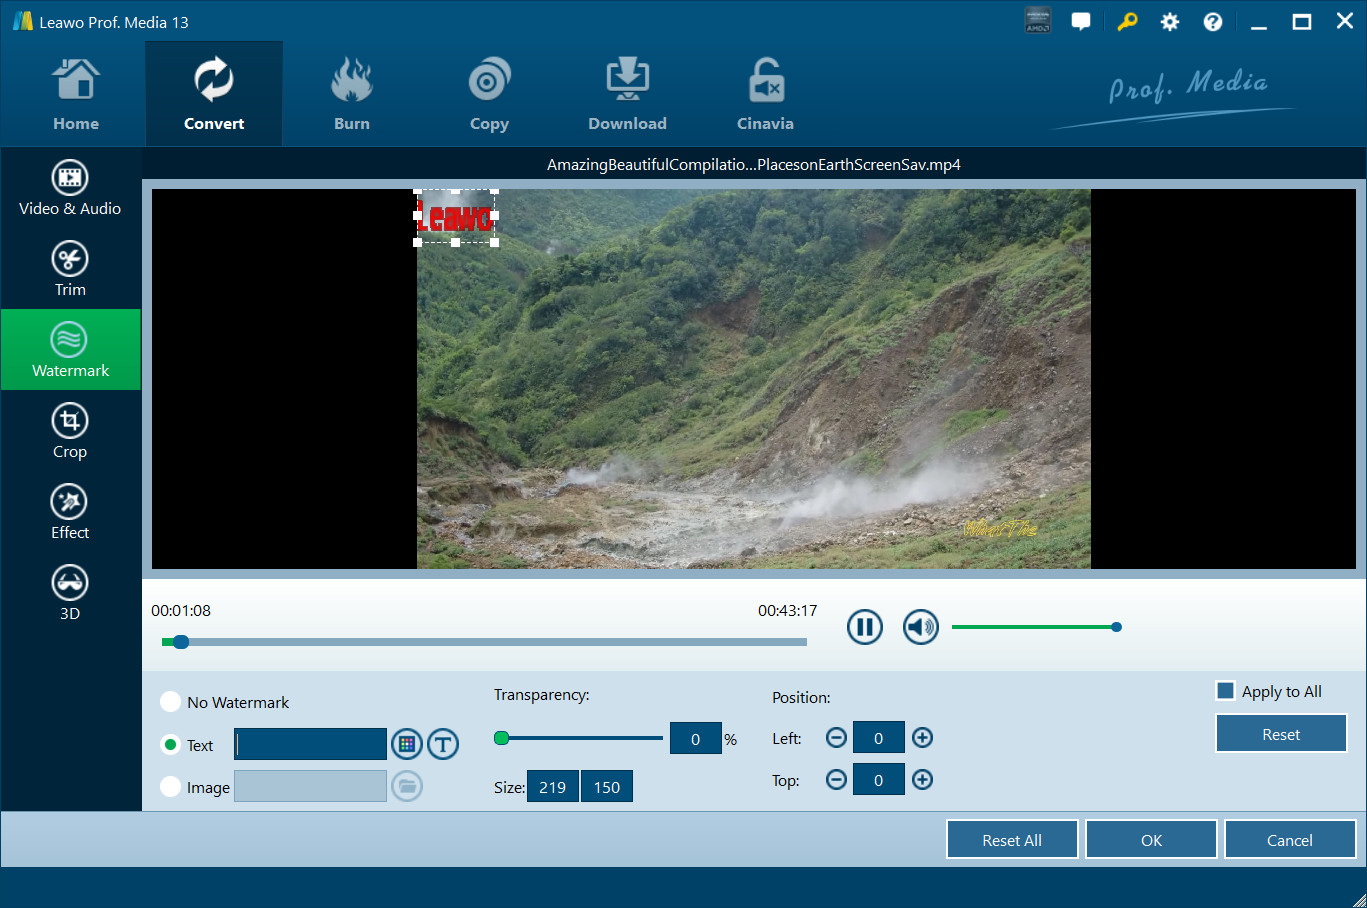
Add a Watermark
Open the Watermark tab to activate the Watermark switch. The watermark feature allows users to incorporate text or image overlays. The watermark allows size adjustments as well as position and transparency modifications. Select “Apply to all” to extend it across all videos then confirm with “OK”.
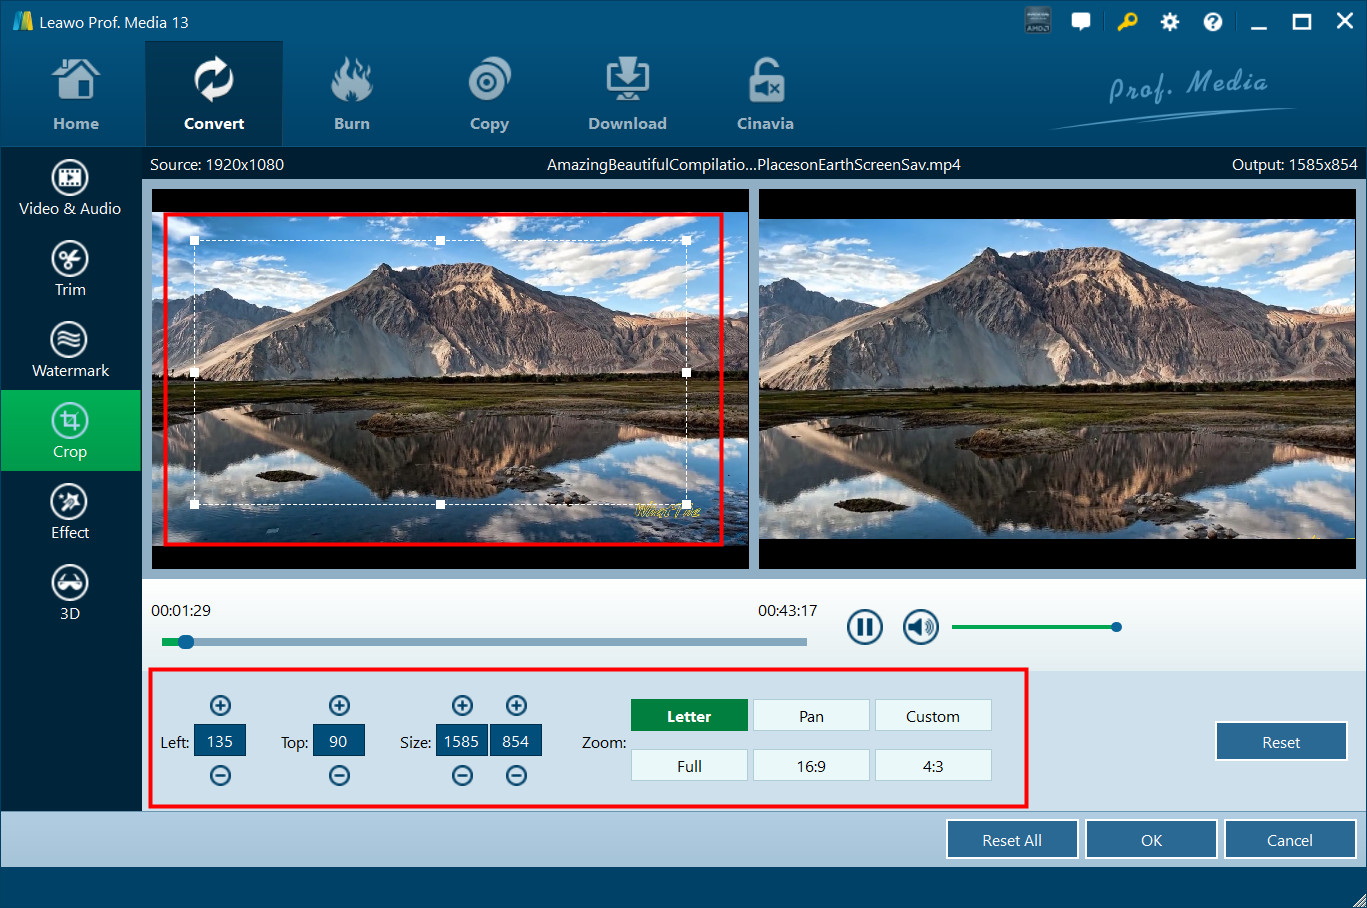
Crop the Video
Move the adjustable frame inside the Crop tab to specify which video section should remain. Preset aspect ratios such as 16:9, 4:3, and Full are available for selection. Precise adjustments of the crop can be made by setting specific values for Left, Top, and Size. Once set, press “OK.”
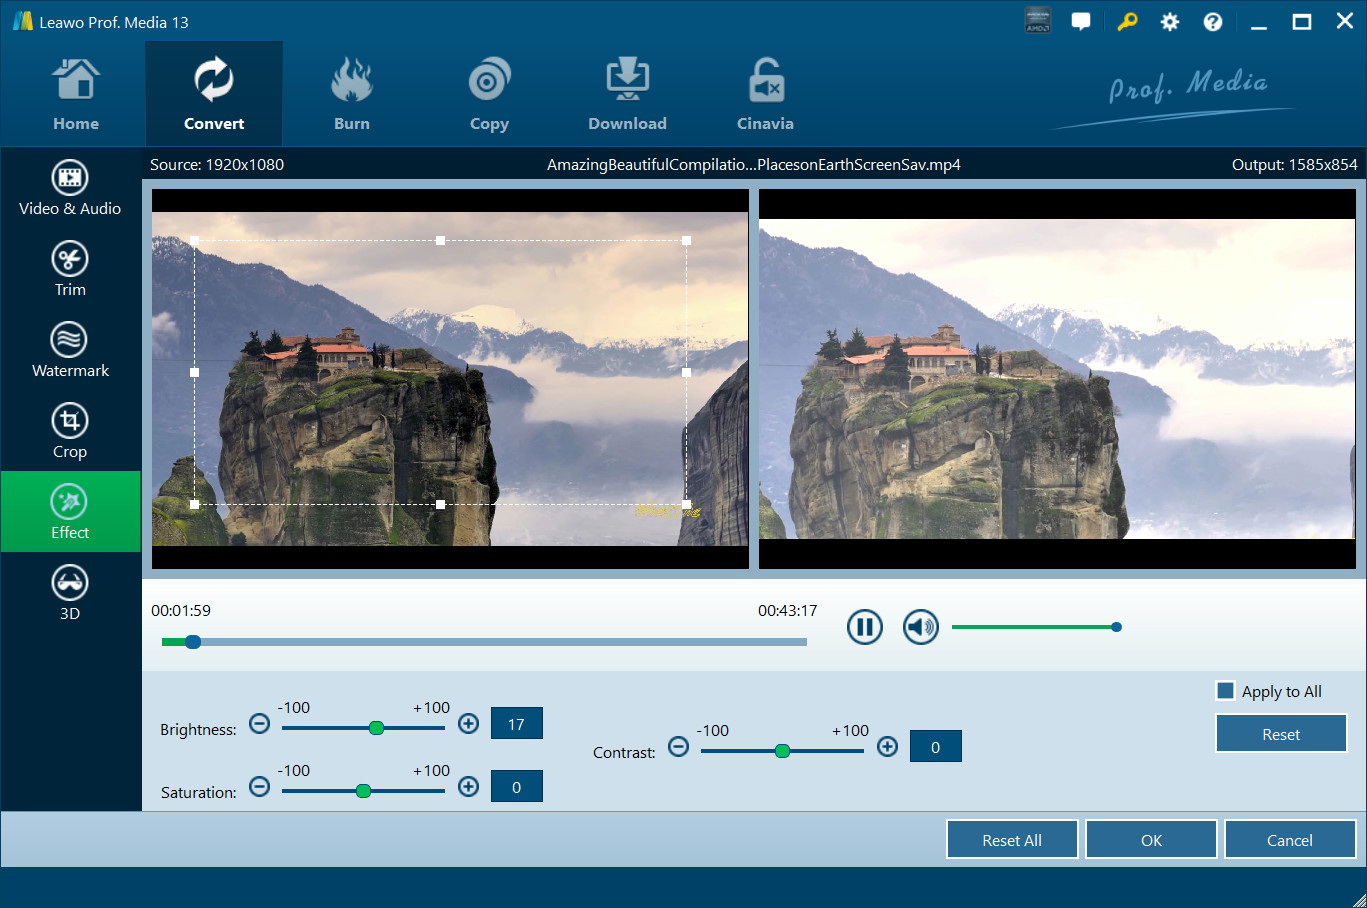
Adjust Video Effects
The Effect tab contains sliders that you can use to adjust brightness along with contrast and saturation levels. You can preview changes in real time.
Once editing is done, go back to the main interface, choose your desired output format, and click Convert to export the trimmed video.
Conclusion
VLC Media Player can help you trim simple video clips, but it’s not a full video editor. Its trimming feature is limited and not always accurate. If you need better control, faster editing, and more features, Leawo Video Converter is a great alternative. It lets you trim, edit, and convert videos with ease and high quality.
-
How to Trim Video in VLC?Cassie/2025-04-22
-

3 Methods to Download Movies on Pluto TVCassie/2025-03-18
-
How to Download YouTube Clips?Cassie/2025-03-06
-
How to Download Instagram Audio?Cassie/2024-10-30
-
What is H.264 File? 3 Methods to Convert H.264 to MP4Cassie/2024-10-30
-

USTVGO Alternatives for High-Quality Live TV StreamingPatrick/2024-10-30
-

10 Best Websites Like KissAsian to Watch Asian Dramas FreeLumi/2024-10-29
-

10 Best Free Movie Streaming Sites in 2024Leia/2024-10-28
-
10 Best FMovies Alternatives 2024Leia/2024-10-21
-

Top 10 CMovies Alternatives to Watch HD Movies and TV Shows for FreeLumi/2024-09-29